Aim:
To choose an image open for creative interpretation. Apply
different processing techniques (experiment with lots of different options).
Then make three different versions of the same image, a written description of
what I was trying to achieve, and how well I think I succeeded.
Procedure:
I went to Mt Cootha Botanic Gardens last week and thought
carefully about composing some shots of the various cacti and succulent plants
which I thought would make good subjects for this exercise, and future
desaturation exercises where texture and form are important. I have been doing
some reading about ‘exposing to the right’, so for all shots I bracketed one
stop either side, using aperture priority.
Back at home, after uploading my images, I carefully looked
at the clipping on the brightest shots, and kept those that were not clipped,
and deleted the ones with lower exposure. I don’t want to get in the habit of
keeping three versions of an image with only the exposure different. My Hard
Drives already fill up too quickly, particularly with this new camera!
I then selected those images that I thought had lower
dynamic range and were thus suitable for this exercise. I was quite pleased
with my selection These images are shown below:
 |
| Selection of images appropriate for this exercise |
I went on to choose my image to work with for this exercise,
shown below without any post-processing:
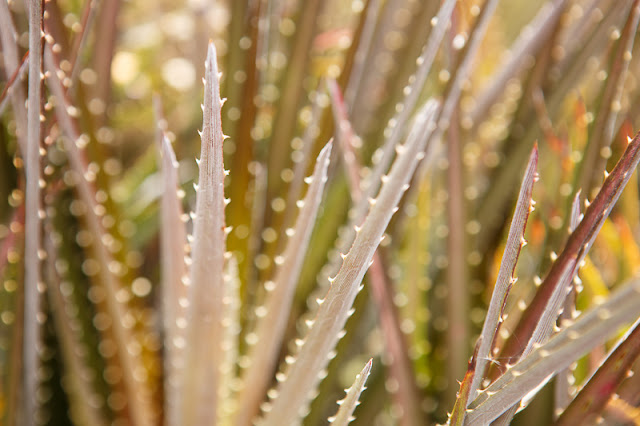

I first ‘optimized’ this image, shown below:


In Lightroom I made a virtual copy of this image and started
processing. I did lots of experimentation, tried tweaking all the sliders and
using black and white and just generally getting a feel for what could be done
in Lightroom, as I’ve mostly only used presets before. I did use the presets a
bit, but also tried to understand what was being done in the presets so that I
can use them in the future with more knowledge. Below is a selection of the
different processing techniques and results.
 |
| Selection of processing techniques in Lightroom |
I then chose my favourite four images (below):


before selecting the final three which I will discuss here
(below):


First image:

 |
| Soft Black and White |

In this image I was trying to achieve a soft looking black
and white image, which was quite high-key and old-fashioned looking. To do this
I first did a simple conversion to black and white, and then adjusted my
exposure, black clipping point and highlight tones to make the image bright and
light feeling. Then I went to the vignette slider (under ‘effects’) and added
in a white soft vignette to the image. I also added in some grain to make it
look lit it might have been shot on film. Finally I adjusted the shadows,
clarity and contrast slightly.
I really like this image. It is soft and floaty, which
contrasts nicely with the spiky points of the cactus. The vignette on the
corners adds to the washed out feel and I think it suits the addition of slight
grain. I have kept some of the blacks quite deep to retain some contrast in
this image. Overall I feel it is a successful and quite different rendition of
the original image.
Second image:


 |
| Contrasty Black and White |

I was looking for quite a harsh, contrasty black and white
image to provide a stark comparison to the previous soft image. So I chose the
opposite route basically. I applied a heavy contrasty blue filter to the black
and white starting image. This darkened down the image considerably, but I kept
the highlights high and bright to really emphasise the tips of the plant and
small spikes. There is a dark vignette applied to this image to bring back emphasis
to the plant and heighten the drama.
I like the strength and surprise in this image. The plant looks so very spiky and dramatic.
I like the strength and surprise in this image. The plant looks so very spiky and dramatic.
Third image:
 |
| Cross-processed image |
 |
| settings for producing 'cross-processed' image |
A bright, light, colourful ‘cross-processed’ image. I tried
a few versions of bright, contasty, highly colourful images and decided I liked
this one the best. I have not done ‘cross-processing’ at all before, but quite
like the effect it has on this image. I also played a bit with the saturation
and luminance of some colours to boost the effect. I like the high contrast,
slightly otherworldly colours that have been brought out in this image.
Conclusion:
The notes ask me to consider ‘how well I have succeeded’.
Well I had some feelings about light/dark/bright colour but not more than that
really before I started. I chose my starting image quite carefully (shot with
this project and other similar ones in mind), so I guess I’ve been successful
in the sense that I have imaginatively edited this image into three more
interesting, different images. This in some ways for me has opened up a whole
new creative side to my photography, as I have not spent much time at all
before ‘editing’ images in this way (mostly choosing to stick more closely to ‘reality’,
whatever that means!). This exercise shows me that a little tweaking here and
there can radically alter images (sometimes for the better, sometimes not so),
and that there is great variety and scale of change that can take place in one single
image.
No comments:
Post a Comment