I have chosen a reference image, as suggested I have chosen a portrait image, shown below with no sharpening applied (at this point I note that Lightroom by default does apply sharpening). I have zoomed in (using Photoshop Raw) over an area of the original image, where at 100% it about fits the size of my print at 8 by 10. I was unsure of how to otherwise 'print at full size', as this is a bit vague, depending on camera resolution and DPI etc.
What is sharpening?
I decided to do some reading about what sharpening is, and why it is used. It is used differently depending on if a print is for screen or print, and probably also depending on what paper it is printed on (eg newspaper vs gloss vs canvas or other materials). I found the following information on a fellow students blog which I have copied below to help me out:
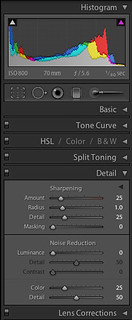 |
Amount Slider: This slider allows regulating amount of sharpening; setting the value to 0 can turn off the sharpening. Depending on the amount specified, the contrast between varying pixels increases. This creates the illusion of the edges being sharpened. |
| Radius: Regulates the area to which sharpening is applied (outside the perceived edge). It is like the feather effect of “Photoshop”. Need to use this slider judiciously; otherwise it can produce strange effect. | |
| Detail: This slider adjusts how much sharpening will be applied on the details of the image. Smaller number will be restricted towards the edge, where as a higher number will affect greater details. This slider can help to bring out the texture. However, there is a risk of increasing the noise in an image. | |
| Masking : This is the most practical and nifty feature. It masks the area that does not require sharpening. It is similar to the mask tool in Photoshop however; it is not as controlled. |
Taken from http://ocastudynotes.wordpress.com/2012/05/16/775/ for personal study purposes
I should note that it is important not to over-sharpen as this can introduce noise into images (an interesting article in Wikipedia). And to always observe the changes when zoomed in, at or around 100% magnification, to see the effects properly.
The sharpening was actually undertaken in Photoshop, but the same RAW engine is underneath both programs, so I won't investigate any differences in the two software packages (there shouldn't' be any!). I have not done any other editing.
 |
| no sharpening applied |
 |
| mild settings of sharpening |
 |
| settings for mild |
 |
| medium settings of sharpening |
 |
| settings for medium |
 |
| heavy settings of sharpening |
 |
| settings for heavy |
I then uploaded the four images to a new site, Atkins Technicolor, which is based in Adelaide (where I now live) for printing. I have had some prints done there before, they are somewhat expensive, but a professional printing lab and I know that they will be high quality. I would like to use them for all my final printing for my work from now on, despite the costs. The advantage is I don't have to pay for postage and can just visit them in a lunch-break from my office, thus being moderately convenient. I note that we are meant to have a printer for this course. We don't own one and never have, and I must admit I don't really want to start fiddling with inks and having a huge printer in my work area, so I am going to avoid it for now and if it becomes an issue in the future I will deal with it then. I can't imagine every single OCA student has a printer at home...
Once I had the prints at home, I observe the differences...
Firstly I compared each print with the other. The 'none' version does look quite soft, particularly when compared with the others. The 'mild' and 'medium' both look good - the eyelashes are sharp and there is some texture on the cheeks and nose but not too much generally. The 'heavy' is noticeably sharper all over, probably to the detriment of the image, with there being too much sharpness on the cheeks and nose which should be softer. This could probably be controlled with the 'masking' option in Lightroom and Photoshop, which simply masks out continuous areas so they are not sharpened.
When comparing between the print and the screen, I think the print can handle more sharpening than the screen image. This is probably because there is some slight matte-ness to the paper that 'absorbs' some of the sharpening? The 'heavy' for example, in print, just looks a little too sharp, whereas on the screen it is quite obviously over-sharp. I would probably choose the 'medium' for my selection in print form, whereas I would choose the 'mild' for the onscreen version.
Conclusions:
I think that the amount of sharpening required will vary for different scenes - perhaps a landscape print will need different sharpening to a portrait and so on. Something that should be tested before any large scale prints are made perhaps? The prints are more 'forgiving' than the screen for sharpening, so perhaps I should apply slightly more sharpening for printing than for on-screen images. Generally though I don't use much sharpening, just stick to the default for Lightroom ('mild' in my testing above) which seems to do a good job generally. It's always possible to sharpen more later, but removing sharpening is less easy!!
References:
http://www.atkins.com.au/tkins-prints-online/ [Accessed on 24/05/13]
Wikipedia (2013), Unsharp masking [online], Available from http://en.wikipedia.org/wiki/Unsharp_masking [Accessed on 27/05/13]
Madhvee Deb (2012), OCA Learning Log [online], Available from http://ocastudynotes.wordpress.com/2012/05/16/775/ [Accessed on 27/05/13]
No comments:
Post a Comment