Saturday, 24 March 2012

QCP visit, March 24th, 2012

A visit to the Queensland Centre for Photography in my lunchbreak on Friday.


A couple of artists that caught my eye are listed below, and I have found their own websites to link to.

Scott Howes - Link here. Backpacking / roadtrip style images across Central Australia, with deep saturated colours, long shadows and stunning clouds and sunsets to match. Feels like a road-trip, with images from inside the van/car etc included.

Scott Howes, taken from QCP website for personal study purposes

Prudence Murphy - Link here. Watching children play, ... with toy guns ...  Interested in childs play and learning about interacting with the world around them.
Prudence Murphy, taken from QCP website for personal study purposes


Leanne Sauer - Link here. Disturbed series of still-life images which form metaphors for personal (complex) relationships. Not pretty... but as a series, very evocative and questioning of what relationships mean and how society views and expectations are placed on us all.
Leanne Sauer, taken from QCP website for personal study purposes


Notes from QCP visit
References:

Howes, S (2012), QCP Two days till Saturday. Online, available at: http://www.qcp.org.au/exhibitions/current/album-693/28  [accessed 24 March 2012]

Murphy, P (2012) Prudence Murphy Photography. Online, available at: http://www.prudencemurphy.com/ [accessed 24 March 2012]

Murphy, P (2012), QCP Boys with Guns Online, available at: http://www.qcp.org.au/exhibitions/current/album-694/28 [accessed 24 March 2012]

Queensland Centre for Photography (2012) Website. Online, available at: http://www.qcp.org.au/ [accessed 24 March 2012]

Sauer, L (2012) Leanne Sauer Photography Online, available at: http://leannesauer.com/ [accessed 24 March 2012]

Sauer, L (2012), QCP Committed Online, available at: http://www.qcp.org.au/exhibitions/current/album-695/28 [accessed 24 March 2012]


Exercise: Editing

I am using the images shot for Exercise Workflow 2 for this exercise, shot at the Coorong. I started with 226 images which all cover the same location. Within this set there are a number of sequences of images exploring the same subject, trying to improve, as recommended in the course notes. I downloaded the images to my computer using a card reader. These were placed in folders:
JPG files : Photos/DPP_1/Part_1_Workflow/Workflow_2_Editing/
RAW files: Photos/DPP_1/Part_1_Workflow/Workflow_2_Editing/cr2
At this stage of my learning process, I work mainly with out-of-camera JPGs.

Step one - the technical edit

A folder was placed in Workflow_2_Editing called /delete.

I star all images 1 star, and then go through assigning zero star rating to all images I don't like, for example, camera shake, obvious massive under/over exposure, repeat images that are the poorer version, etc etc. This is of course quite a personal process and very subjective. I do this with DigiKam software, with the setting at full-screen to maximise the viewing area of the images.

All zero star images are placed in the /delete folder (and corresponding RAW files). These are reviewed at a later review session and then deleted once I'm happy with my choices. This saves on disk space and makes viewing of the better images thus more enjoyable.

At this point I also tagged all my images,  though I'm still a little unsure of how best to do this. 

Step two - the selects

This left 157 images with one or more stars, all technically OK, example below.
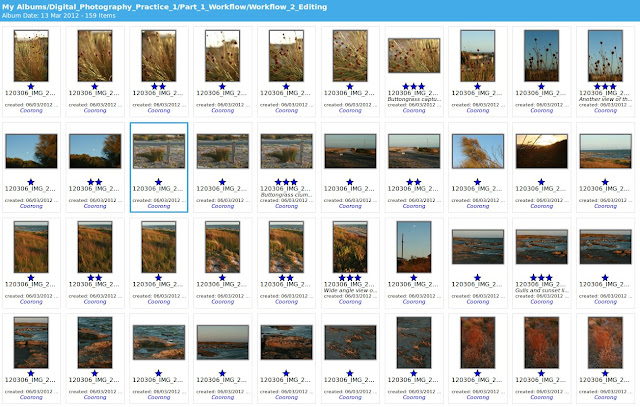
Example of images with one or more stars, the result of the technical edit.
Again at full-screen setting, I review the images and apply various star ratings:

0 star = move to /delete folder
1 star = low potential
2 star = moderate potential
3 star = good potential
4 star = definite best images to edit

At this stage I just used 1, 2 or 3 stars.

Step three - the first selects

At this point of the process I had 11 images with 3 stars. These are my first selects (displayed below) and I made a brief note in the 'comments' box to explain why I liked each image.
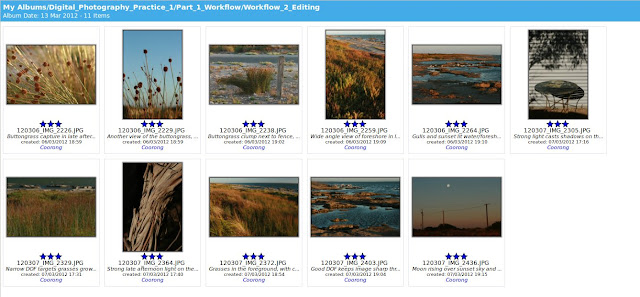
11 images with 3 stars. Comments added to each image.

Step four - group and review

I stopped working and came back later, and reviewed all my choices. I was happy and did not make changes to my first selects this time.

Step five - a final choice

I then displayed just my first selects and went through to choose my final two images to process and present. I did this by viewing in full screen mode and simply choosing those two images I liked the best, and gave them both four stars.

The first image I chose because I liked the strong shadows, simple setting and the 'country' feel the image has. The colours are muted and simple, and I felt like the whole image just worked.

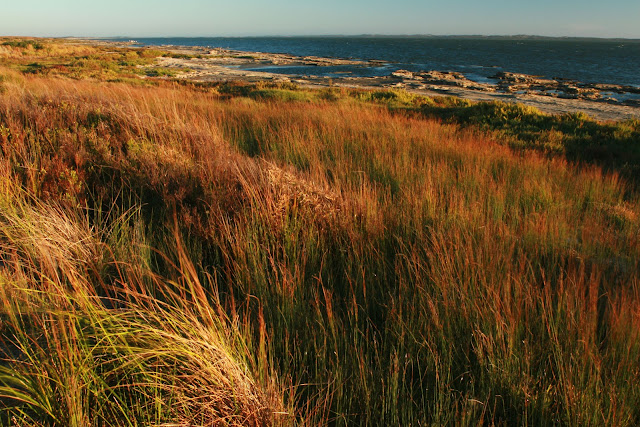
The second image I chose because I wanted a view of the actual coorong water and decided I liked the texture of the grasses in the foreground. The DOF (from using f/22 with a 24mm focal length) is large enough to capture most (all?) of the image in focus which is important for landscape images like this one. The colours are strong, and vary across the image, with the shadows, and obviously show the time is late in the day. More birdlife on the water in this image would have added to it, but I felt overall it was a stronger image than the others in my set.

Post-processing of final choice images

My workflow from here was to take the two images into Photoshop CS2 and edit them there. I followed roughly the same sequence for both, detailed below:

1. Open .jpg file in Photoshop
2. Change resolution (300 ppi), and size (to 18 x 12 inches)
3. Save as new file, in tiff format, and with extension _18x12_001.tif
4. Create a copy of the background layer
5. Check colour balance and adjust if necessary (not required for these two images)
6. Apply levels/curves as layers to whole image, when using levels use the 'alt' key to see impact. Adjust opacity to curves to decrease impact.
7. Localised editing. In this case, Image 1 did not require any - the dirt is real and on the wall, and thus was not removed. For Image 2, I did some spot healing and cloning for minor marks in the sky, possibly dust spots that have been hard to remove on the sensor (which I cleaned prior to my holiday). I zoom right in to 100% for this process, and also make sure I zoom right out to view the whole image to make sure any retouching is subtle and not seen in the final image.
8. Crop as necessary. In this case, only Image 1 was cropped a little to slightly reduce the dark shadow area at the bottom of the image.
9. Unsharp mask
10. Save as both a tif file (to keep layers) and jpg file (flattened).


I am in the process of learning about Photoshop at the moment, both through an evening course and also reading 'Evening, M, 2005, Adobe Photoshop CS2 for Photographers, Focal Press, Oxford', so my workflow will hopefully develop as I learn more.

The final two images are displayed below.
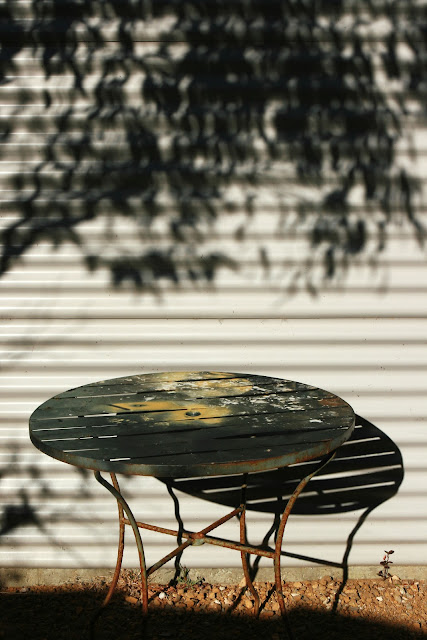
Table against wall

Coorong; Grasses and water at sunset

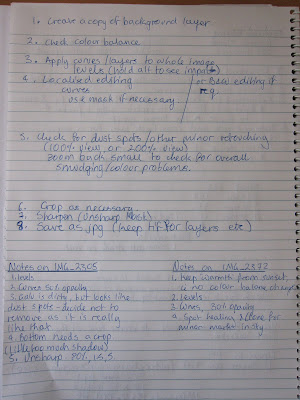
My notes in my logbook are presented below:
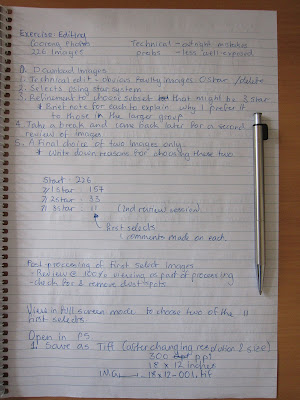
Logbook Notes, Editing

Logbook Notes, Editing
In conclusion, I already had some kind of editing process, but it was good to formalise it through this exercise. I will continue to use this system in future projects. I want to learn more about tagging images (keywords etc), which I will try to do some reading on. I will also continue my reading and learning more about post-processing which is an important part of the modern digital workflow.

Exercise: Your own workflow 2

The aim of Exercise: Workflow 2, is to devise a workflow for a specific shooting assignment that is longer in length than the one in Workflow 1, and will thus involve a larger number of images. I shot 226 images while visiting family at the Coorong, which is a natural region South of Adelaide, whilst visiting recently.

Pre-Shoot and Shoot:

My pre-shoot and shooting plan is displayed below:


Workflow flow-chart, Preparation and Shoot

I chose to use my Canon 30D for the shoot, and brought two lenses along, with matching filters (polarizer, neutral density etc). I had my tripod with me but did not take it out on every shooting session. As this was a landscape shoot, all light was natural, and the time of day very important. I did almost all of my shooting in the two hours before sunset, though I did take a couple of photos in the middle of the day, and some in the afternoon for contrast. I varied my camera settings depending on subject, light availability, time of day, and whether I was using my tripod or not.

I was not able to edit any images during the shoot as I didn't have a laptop with me. I did however review on camera after each session and made adjustments to my plan for the next session (for example, I took my tripod down on the second evening so I could use smaller apertures and increase my DOF). In terms of variations to the above workflow, I accidentally left the cable for the battery charger in my bag left in Adelaide. Fortunately it's just a kettle lead so I could borrow one relatively easily. I only deleted a few images during the shooting sessions, as review on the back of the camera is not ideal.

Post-Shoot:

My flow chart is displayed below:
Workflow flow-chart, Post-Processing
I followed the flowchart above fairly closely. After reviewing my images initially, I ended up with 157 images with one or more stars. All zero star images were moved to the /delete folder, and deleted later after a second review. I performed the starring process over a number of sessions in order to adequately review and 'step back' from the process, which I find very useful. All starring sessions were performed with Digikam set in full-screen mode, to maximise the space the image takes up on the screen. I will write more detail about the editing process for these images in another blog, for the Editing Exercise.

I then determined I had 11 images with 3 stars. They are shown below:
Images with 3 stars.
I then chose two images which were processed further in Photoshop to represent my visit to the Coorong. They are displayed below.

Table against wall
Coorong; Grasses and water at sunset
My post-processing workflow is in the midst of change. I am going to night classes once a week to learn more about photoshop editing, and applying these learnings to the workflow I used on the images above. I will write more about that in Editing.

My notes in my logbook for this exercise are shown below:
Notebook for Workflow 2

In summary, I followed my flowchart more closely for this exercise, as I incorporated the learnings from the previous exercise. Reviewing during the shoot enabled me to improve my images and to leave with a wider variety of images than had I just one out once. 

Monday, 19 March 2012

Bob Carey Photographer

Aline Smithson has a blog called L E N S C R A T C H which I follow, and this recent post stood out to me. In short, it's a personal project that started as just that, but has become a fundraising project for breast cancer research. It's an example of charitable photography but with interesting, quirky images.

The photographer, Bob Carey, obviously knows his stuff, from looking at his website. His portraits look casual but I suspect are perfectly planned. I wonder if they are mostly opportunistic (out wandering, targeting people he spies), as the situations look fairly natural. I really like the use of mixed eye contact in the pair portraits. It adds an air of question to the image.  The 'Tutu Project' is unusual and eye-catching, as well as making interesting viewing. All-in-all, an inspired photographer I am glad to have spied.

This image below, for example, is bold, colourful, and simple but yet also making a gently humorous statement at the same time.  The photographer is concerned with social issues, but wants to make them approachable for everyone - he doesn't mind having a laugh at himself which might be a useful skill!

Taken from Lenscratch website for personal study purposes


References:
Carey, B (2012) Bob Carey. Online, available at: http://www.bobcarey.com/ [Accessed 19 March 2012]

Smithson, A (2012) Lenscratch. Online, available at: http://www.lenscratch.com/2012/03/bob-carey-and-tutu-project.html [Accessed 19 March 2012]
 

Friday, 16 March 2012

Exercise: Your own workflow 1, Part 2

The second part of this exercise looks at the computer side of the workflow. Here is my planned workflow:

Workflow flow chart, Post-shoot

I started following the workflow above, but when it came to deleting photos I was not happy, so I created a folder called /delete/ and placed the .jpg and .cr2 photos I thought I would delete in that folder. That gives me the option of double checking at the end of the process that I really want to delete them, and do so then. It is a little less final than doing it in the first round of checking.

I started with 60 images, including 3 with grey card. I tagged all my images. I set Digikam on full screen mode, and go through using the star system as detailed in my flow chart. Any images with zero stars went to the delete folder (apart from the grey card images) after this first round. I moved 24 images, leaving 33 with one or more stars. I then deviated again from my workflow, and displayed all 3 star images and changed some to 2 stars. I also displayed all >2 star images and changed some to 1 or 3 stars and did the same for all 1 star images. Basically I did an extra review afterwards which I had not included in my workflow above. This left me with 8 images with 3 stars. Being more rigorous with my star system really helped me to  get to these 8 images more quickly than I would have otherwise, as did using the /delete folder.

Here are my 8 images:

8 images with 3 stars
I then decided to do further starring and chose my favourite image 2147 to open in Photoshop. For this exercise I decided to try editing from the raw file but was unable to produce an image that I liked as much as the out-of-camera jpg. For this reason I then opened the jpg in Photoshop and edited from there. I saved as a tif (with suffix _003 as I had made two attempts on the raw file and wanted to keep the naming separate) to preserve the layers and prevent degradation of image quality. On a layer copy of the background I removed two tiny reflections in the glasses of my model which I thought were distracting (from the flash) using the clone tool. I also used very minor curves adjustment at 50% opacity to increase saturation slightly. I then saved my image and checked how it looked in Digikam compared to the original jpg. Once I was happy with it, I saved the file as a jpg, and also resized to 8 by 12 and placed in my /upload folder ready to upload to the web. In this case I have left quality at the maximum so that my tutor can see the file at its best, but perhaps for general uploading to the web it would be sensible to decrease the quality slightly?

Final chosen image
So in summary I am happy in general with my workflow, but needed to make changes, mostly to the post-processing part. I am still in the early stages of learning about post-processing, and have found this exercise very useful as a way to document and learn about the pros and cons of various options. I have also looked at other student's blogs and seen what their workflow is, which has assisted me. I imagine that my workflow will continue to evolve as I learn more through this course, so this will be an interesting exercise to return to review later.

Exercise: Your own workflow 1

The aim of this first exercise is to plan a workflow and then put it into practice for a specific short assignment, in this case a portrait session. I visited family in Adelaide last week, so decided to make use of the time to undertake the portrait shoot. Prior to departing Brisbane, I planned my workflow in two parts, firstly the actual shoot, and secondly the processing afterwards.

Here is my plan for the shoot:
Workflow flow chart, Preparation and Shoot
Choice of equipment was important, because I needed to take everything I needed with me, and could not carry my whole kit. I chose a lightweight option which included Camera, two lenses, Flash and Tripod. I had other accessories with me too.

In Adelaide, I decided to just use my parents backyard for location as I could throw the background out of focus nicely with my 50mm lens, and I chose an early time of day to prevent harsh overhead lighting from the Aussie sun. I asked mum to be my model and she was happy to pose for me. During the shoot I used the flash sometimes and turned it off at other times, as the sunlight was somewhat variable.

We tried a couple of poses - standing first, then seated in a chair, and I found that even the height of the tripod made a difference - i.e. looking slightly down onto her face resulted in better images. Unfortunately, we had company in the backyard which resulted in some shots where she is focusing on someone else (perhaps next time I would be better to go somewhere further from home alone with my model). Also I found asking her 'not to smile' difficult, as it resulted in frowning and obvious concentration on 'not smiling', which was not the result I was after. I stopped that, and instead attempted to direct her roughly where to look and how to angle her head.

We photographed for roughly 40 minutes before I felt that we had both had enough and we decided to stop. I then packed up my equipment, made some notes in my notebook (see below) and deleted obvious duds from the camera. Later that day I backed up my images onto mum's computer.

I followed my workflow fairly closely for this part of the exercise, and found it very useful to have planned out the shoot beforehand. For a future portrait shoot, it would be useful to choose a more isolated location, and potentially have some example images on hand to assist in directing my model (and get ideas for poses and facial expressions).

Notes in notebook before and after shoot
I will continue writing about this exercise in a second blog post, detailing the 'on computer' side of the workflow.

Tuesday, 13 March 2012

photo-graph blog

I have been greatly inspired by Keith Greenough's blog, which I discovered via the OCA blog. He is a level 3 student, so obviously much more advanced than me, so it's great to see where OCA students get to beyond the level 1 and 2 courses, and how much more self-directed the study is at that level. I have had a good read of his blog (some notes below) and am continuing to follow his studies and projects with interest. I like the way he displays his work in different styles, sometimes just one image, framed in white with text below, other times a small collage of images, and recently, a slideshow of fabulous B&W images taken in Museums in the London area.

I also like the setup of his blog (I think it is through Wordpress), which has snippets of his recent posts on the left, with recent images on the right. He seems to post fairly regularly and this keeps the blog interesting and relevant. What I don't like about his blog (and others I have seen) is the ads underneath the bottom of the post. Not for me thankyou...

He obviously has a number of projects on the go at once, using a couple of formats of cameras (he experiments with film and digital) and doesn't always appear to have a plan as to how he will attack a project, sometimes just 'seeing what happens'. I like this spontaneity, but I also like that other projects he works on are obviously large, long term and require a lot of planning. There is a lot of depth in his photographic work.

Notebook


References:
Greenough, K (2012) Keith Greenough Blog. Online, available at: http://photo-graph.org/ [accessed 13 March 2012]
Various authors (2012) OCA Blog. Online, available at: http://www.weareoca.com/ [accessed 13 March 2012]