I have chosen to photograph Brisbane by night for this
first Digital Photographic Practice assignment. This is not a type of
photography I have done before (apart from the odd travel snap), so I thought
it would be a good challenge for me.
I have separated out the phases of the workflow below into
Pre-shoot preparation, The shoot, Post-shoot, Post-processing and Final steps.
I have then put some notes on each individual image I am submitting and finish
with a concluding note at the end of this document.
Pre-shoot preparation planned steps:
1.
Establish subject matter
2.
Plan time of day/ rough location for shoot
3.
Choose appropriate camera equipment
4.
Check batteries are charged
5.
Check memory cards are formatted and ready to be
used
6.
Check settings on camera are appropriate
7.
Prepare other equipment
Pre-shoot preparation comments:
1.
My plan for this assignment was to photograph
Brisbane by night. The city is separated into north and south sides, and there
is a lovely river running through it with lots of bridges crossing it. I
thought these would make a good subject, as would the various other interesting
buildings in the area. I planned to ride my bike so I could easily access more
than one location without too much walking in between. I wish to mostly
concentrate on buildings/bridges but possibly include a few images with people
in them. I plan to use a variety of focal lengths and shutter speeds (though
obviously will be constrained by low-light levels and thus longer shutter
speeds).
2.
I planned to shoot for the couple of hours after
sunset, over two to three sessions, and I have consulted a map and planned out
some possible locations:
◦
Southbank wheel
◦
Southbank beach
◦
Kurilpa pedestrian bridge
◦
Art Gallery complex
◦
Roma St pedestrian bridge over road
◦
Kangaroo point cliffs
◦
Roma St Parklands
◦
The mall
◦
Any interesting buildings that I find
3.
I only have my Canon 30D, so that is the camera
I will be using. I will be shooting using available light and thus won't need a
flash. However a tripod (with quick-release plate screwed tightly on camera), and
cable release will be vital, as will a spare (fully charged) battery. By
planning to shoot over several evenings, I have the flexibility of changing
which lenses I take depending on what my plan is for the specific shoot. My
24-70mm f/2.8 lens is my main workhorse, so that is my starting point, and I
can also bring along a prime (50mm f/1.4), wide-angle (17-35mm f/2.8) or
tele-photo zoom (70-200mm f/2.8).
4.
Check batteries are both fully charged (and
bring spare in bag).
5.
Check memory cards are formatted before starting
out and bring spares in my bag (though I very rarely actually fill a whole
8gigabyte card, except for on holidays).
6.
Camera settings will depend on available light
when I am actually out shooting, but I try to remember to reset before each
shooting session.
7.
Other equipment in this case is my light meter,
notepad (and pencil). I also need transport, so my bike, helmet, lights, lock
and rack with bungy cord for attaching equipment to. A mobile phone to check
sunset times is also handy, and a watch for measuring shutter speeds if using
'bulb' function. I had expected mild or warm weather and was a bit caught out
the first session where I only had a raincoat for warmth (it was suddenly cool
and windy), so I then remembered to bring a warm shirt for the next sessions in
addition to my coat.
I suspect this part of the workflow is quite similar to
what other photographers do, though I know some would consider renting
equipment for a specific shoot, and perhaps I would do so in some circumstances
(certain exotic destinations, or involving animals and thus longer lenses may
be useful). Later models of cameras may go through memory cards faster, or
studio shoots where hundreds of images are shot over a short space of time
would also require more data storage. Potentially in this situation a
photographer would choose to shoot tethered to a computer for direct transfer
of files also.
The shoot planned steps:
1.
Find location and choose a viewpoint
2.
Set up tripod, camera, cable release
3.
Light meter to check exposure if necessary
4.
Set camera mode, ISO, focus mode, metering mode,
white balance
5.
Set aperture/shutter as required
6.
Take a test shot, check on camera and adjust
above as required
7.
Adjust exposure compensation if not using manual
mode
8.
Try a range of shots at each location
9.
Move to next location
The shoot comments:
1.
Various locations were chosen, depending mostly
on time of day, lighting and any pre-visualised ideas. A viewpoint suitable for
the light levels was selected (i.e. including the sky if there is still light
present (up to 15 minutes after sunset), or try to avoid too much sky after
this time).
2.
Set up my equipment, remembering to use cable
releases for most images.
3.
I didn’t use the light meter for most shots
4.
ISO was kept as low as practicably possible
(usually 200), in order to produce the highest quality images (particularly
important for night images which can be noisy), focus mode on ‘one shot’, and I
used a mix of manual and autofocus on my lenses, white balance was generally
left on daylight setting (I use RAW+ JPEG capture so can alter WB in
post-processing if necessary).
5.
Aperture and shutter speeds were set manually,
depending on the effect I wanted to have, and remembering that I was using
partial metering setting.
6.
Test shot, sometimes a series, adjusting framing
and exposure settings. I checked the histogram on some shots when I was unsure
about highlight clipping (though note that the histogram displayed on the
camera is based on the JPEG not the RAW file, so sometimes the JPEG is clipped
by the RAW file won’t be). Exposure comes down to personal taste to some
extent, but it’s important to be aware of clipping of highlights or shadows.
7.
Generally I used manual mode so this step was
not required.
8.
Sometimes I tried a couple of different framing
angles, or turned around to change my viewpoint, or moved a few metres, or
adjusted the tripod slightly.
9.
Moving location involved packing all gear back
up onto my bike and moving, which was certainly good for carrying lots of heavy
equipment but putting the tripod down every time was a small hassle. I would
use the bike again however, because it is a very efficient way of getting from
place to place, which can be important when the available light is low and
changing fast.
I went out for three sessions. I went after work each
time, as I was then already in the city approximately 30 minutes before sunset,
so I could get to a good location when the sun was setting to attempt to
capture some photos in the short time period when the sky is still partially
light. I captured some images when it was still light (i.e. before sunset) on
all three sessions, but was unhappy with these images so have not included them
in the set, instead concentrating on those images after the sun had set. The
first session was very windy and I think this is evident in the photos – there
is a slight blur on some of those with longer shutter speeds. I was unhappy
generally with my third photo session during the shoot (I was quite tired and
ready to go home), but surprisingly pleased with the actual images when I
loaded them up and reviewed them later on the computer. These comprise most of
the images I am submitting for this assignment.
I expect shooting is quite a personal exercise and each
photographer approaches a shoot in their own way. It would be interesting to
work with a professional for a day to see how they go about their shooting
workflow. This part of the workflow depends heavily on experience, and as I
learn more (constantly) about how my camera works, for example different
metering modes, my shooting methodology changes. Now that I am using Lightroom
I may switch to only shooting RAW and not worry about JPEG, but I’m not at that
point yet. I don’t always use manual mode for shooting, as I find in quickly
changing situations it’s easier to use Aperture priority and adjust the
exposure compensation as required, though I appreciate that there is power in
using full manual mode.
Post-shoot planned
steps:
1.
Upload card contents to computer via Lightroom
import feature.
1.
Rename file
2.
Add in IPTC data
3.
Add keywords
4.
Select destination folder
2.
Review images initially to determine clear
rejects
3.
Add further IPTC data such as location and
keywords to remaining images
4.
The select phases, including a review period
5.
Final choice of images for post-processing
Post-shoot
comments:
1.
The Lightroom import is a quick and easy
process. It starts automatically when a card is put in the card reader.
1.
I change the name to add in the date before the
automatic file name
2.
A metadata preset applies basic IPTC data to
each file
3.
Keywords are added at this stage (e.g. Brisbane,
Night, DPP1) – more can be added later but it’s a good idea to add some at the
import stage
4.
Destination folder (for both raw and jpeg files
out of the camera) in this case is /Photos/DPP1/Part_1_Workflow/Assignment_1/
2.
The technical edit. Images are reviewed in full
screen mode and the ‘x’ shortcut is used to highlight reject images. These are
reviewed a second time (using the Flag filter feature) and deleted later.
3.
I add in specific location information and any
keywords that may not have been applied at the initial import step. The
auto-complete feature in Lightroom makes keywording much easier than in Digikam
where I had to click on each keyword to apply it.
4.
Image rating takes place in (a minimum of) two
steps – an initial review, and then further reviews (after a break) to refine
the selection, progressively increasing the use of higher stars, and focusing
in to determine the ‘best’ images. In the case of this assignment, I need to
submit 6 to 12 images, so was aiming to have at least a dozen images at 3 star
level to consider my final selection from.
5.
Of these 3 star images I then whittled my
selection down to 7 chosen images for submission, giving them each 4 stars.
I imagine the Post-shoot workflow described above is
fairly standard, with only minor variation between photographers, perhaps use
of different star levels, or colours, or order of steps. Some photographers
probably spend more time keywording, for example, if they sell to stock image
sites etc.
Post-processing
planned steps (selected images only):
1.
Change size and resolution, save as new file in
tiff format
2.
Apply white balance correction
3.
Apply curves and levels adjustments
4.
Localised editing
5.
Creative editing
6.
Crop
7.
Save as a tiff file and as a jpeg (sharpened for
screen/print as necessary)
Post-processing
comments:
1.
Open images in Photoshop (right-click menu in
Lightroom). Change size to 12 x 18 inches, and resolution to 300 ppi, and save
in tiff format with extension _18x12_001.tif
2.
Using layers, apply white balance correction to
images as necessary. I have not got a calibration setup for my monitor yet,
though I do realize this is important (I have just purchased a new factory
calibrated monitor, and my next purchase will be a calibration setup).
3.
Apply levels/curves as
layers to whole image, when using levels use the 'alt' key to see impact.
Adjust opacity to curves to decrease impact.
4.
Editing as required,
for example spot healing, cloning on dust spots, noise from long exposure times
etc. There was a bit of noise in the sky in some images, and also some strange
colours probably from long exposure times and lights. Where this looked strange
I removed it (only over very small areas). For cloning/spot healing I zoomed
right in and then progressively out, as sometimes I felt like I could see the
spots clearer at different zoom levels. I am now doing this on a layer of it’s
own so that I can see the effect of removing spots etc.
5.
On a couple of images
I felt they needed a bit more punch. I used a duplicate layer and changed the
layer setting to ‘colour dodge’ at a low opacity setting.
6.
Cropping as necessary
for each image (creative choice, such as using 1:1, or 5:4, or regular 8x10 for
printing etc). I did adjust the perspective on a couple of images as I had
buildings at slightly strange angles (due to wide-angle framing). I did this
using the crop tool and keeping the ratio constant (18x12). In this case I have
kept all images at 18x12 ratio.
7.
Tiff file to maintain
layers so I can return to later, and matching jpeg file for printing etc. Back
in Lightroom I can create a lower resolution jpeg for uploading to blog/flickr
etc when I am happy with the final set of images.
I foresee that the above workflow will
change as I learn more about what can be done in Lightroom. At this stage I’m
only just learning about it so will use Photoshop for most of my
post-processing, but I hope to move some of the more simple post work into
Lightroom to improve efficiency. I have noted some websites that have Develop
presets which look like they offer some automated creative starting points
which I will experiment with at some point.
Using sophisticated software such as
Lightroom and Photoshop for managing and editing images means that there is
much room for variation between photographers. I have recently completed a
basic Photoshop course, and the workflow above is somewhat based on what I
learned there. I have also done some reading online and in books (e.g. Evening
2005, Evening 2010) which has assisted in my workflow development.
Final planned steps
1.
Backup of data
2.
Export for web/submission
3.
Printing
Final steps
comments
1.
Backup of Lightroom catalogue on exit (once per
day). Backup using automated program (Areca) at least weekly (use a calendar
alert to remind me) onto external HD, one stored locally, one offsite, swapped
every few weeks.
2.
Export for web using Lightroom, with JPEG
quality at 80%, and with ‘sharpen for screen turned on. I also exported a set
of JPEG at 100% quality to include with this assignment submission, and used
the ‘sharpen for screen option.
3.
Export for printing with ‘sharpen for
matte/glossy’ turned on. Take to local printer (Officeworks or similar) for
printing at various sizes (this is a step I don’t do very often but perhaps
should consider doing more).
Backup of data is one issue worth considering in more
detail. I currently back up to two hard drives and rotate them between work and
home. I have considered online backup of some files, but the challenge would be
choosing which ones, and how to go about it, considering relatively slow upload
speeds and large file sizes. Another option is to use optical media for
archival purposes of data. Again, file size is an issue, and there is a large
investment in time spent burning DVDs and labelling and storing safely. I like
the 3-2-1 backup strategy mentioned on the dpbestflow website (dpbestflow.org,
Accessed 1 May 2012), that is a ‘minimum of three copies of each file, stored
on two different media types, and one copy should be stored off site’.
I have not yet considered the use of DNG for my image files.
Images:
My selected, processed images are detailed below.
Photo 1: Kurilpa Bridge

Photo 2: Grey St Bridge

Photo 3: Brisbane City Library

Photo 4: Brisbane Wheel

Photo 5: View of M3

Photo 6: Casino
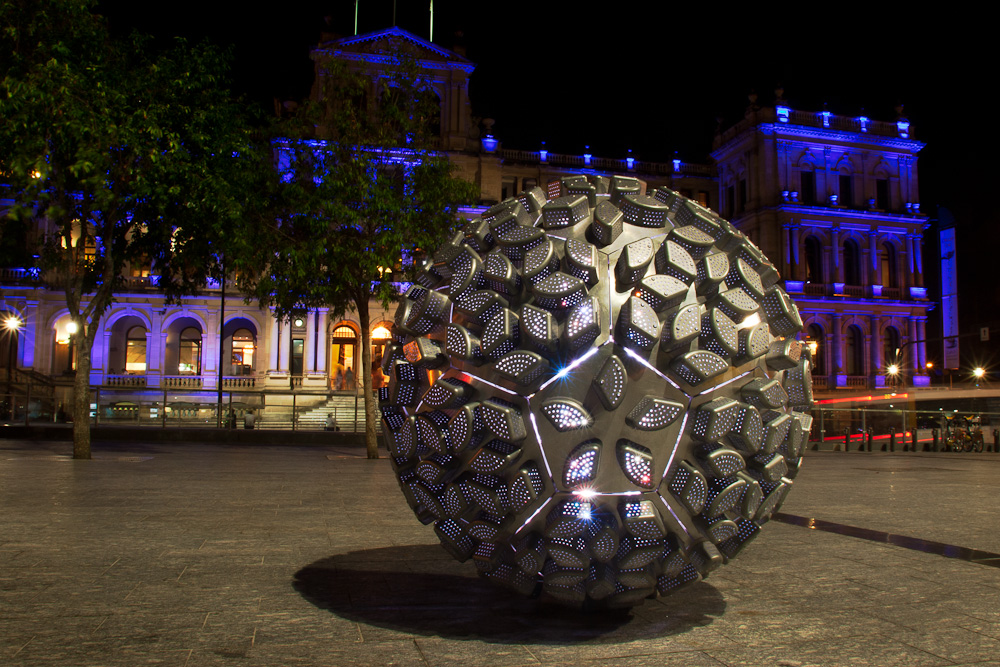
Photo 7: Train tracks

Conclusions:
Overall I have found the process of maturing my workflow
to be enjoyable and rewarding. This assignment has allowed me to push my
boundaries to tackle something I have not done much before, that is photography
after dark. I feel like my set of images is satisfactory and that having a good
work flow has helped me to produce better work than perhaps I would have
otherwise.
I envisage that as I learn about the new tools I have
recently employed (Lightroom specifically), my workflow will change somewhat,
but I feel like this assignment and preceeding exercises have given me the ability
to understand and improve my workflow by myself.
References:
American Society of Media
Photographers, (2012) dpbestflow [online] Avaliable
from: http://www.dpbestflow.org [Accessed
1 May 2012]
Evening, M. (2005) Adobe Photoshop CS2 for
Photographers. Oxford: Elsevier
Evening, M. (2010) The Adobe Photoshop Lightroom 3
Book. Berkeley: Peachpit


